Showing posts with label Networking. Show all posts

How to connect your Mac with network computers or server?

Posted by Muhammed Posted on Thursday, October 17, 2013
In my previous post I showed you how to enable File Sharingin Mac computer. Once you enable the file sharing, you can simply transfer the files between network computer including Mac and Windows. Here I am going to show you the simplest way to connect your Mac to the windows network.

1. Click on Finder and select Go, then Connect to Server


2. Type the IP  address of  the computer or server in the Server Address field in the below format
 smb://xxx.xxx.xxx.xxx (eg:- smb://192.16.1.23) see more format to connectshared computer


3. Then click connect and enter user name and password of the network computer if it prompt.


 4. You will be connected to shared network folder of that computer. You just need to mount it your Mac for future use. 

How to Enable file sharing in Mac OS?

Posted by Muhammed Posted on Thursday, October 10, 2013
File sharing is a service which allows you to share files and folders with other computers on the network. Here I am going to show you how to enable file sharing in Mac operating system. 
1. Login Mac computer as Administrator 

2. Click on Apple Menu and select System Preferences 

 3. From Internet and Wireless, open sharing 

4. Then Enable File sharing and  click on the  (+) button Under Share Folder and select the folder you want to  share. Also you can add user level permission under Users.

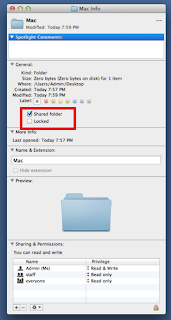
You can also share the folders by right click and choose Get info and select  Shared Folder to share the folder (unselect if you want stop sharing)


Dynamic Host Control Protocol (DHCP)

Posted by Muhammed Posted on Wednesday, February 13, 2013

Introduction to DHCP


Dynamic Host Control Protocol (DHCP) is responsible for assign TCP/IP network configuration to workstation on a private network. The server on a network becomes DHCP server when you install and configure this protocol.  So once you installed the DHCP service, the server will be responsible for providing network configuration to the client machines or devices.

When you enable "Obtain an IP address automatically" in the TCP/IP configuration on the workstation, the DHCP Server takes over the responsibility of assigning the TCP/IP parameters. So you may think what if there is no DHCP server on a network?

A Windows-based computer that is configured to use DHCP can automatically assign IP address to itself  if a DHCP server is not available or does not exist on the network. It is called APIPA (Automatic Private IP Addressing). This feature can be used in small Local Area Network without any difficulty. The Internet Assigned Numbers Authority (IANA) has reserved 169.254.0.0-169.254.255.255 for Automatic Private IP Addressing. As a result, APIPA provides an address that is guaranteed not to conflict with routable addresses.

What is the need of DHCP server on a Private network?


The DHCP server is commonly used in a domain network and the overall purpose of DHCP is to reduce the amount of time required to configure and administer a network.

Assign static IP address is not difficult if your network is limited with 5 or 10 computers but imagine if you have network with more than 100 computers. It will be very hard and also there is chance to have address conflicts. Here DHCP prevents possible address conflicts and human errors. The DHCP Server automatically provides each LAN client with an IP address, a default gateway (router) and DNS server IP addresses

How Does DHCP Work?


Administrator creates pools of addresses and other configurations (Gateway, DNS server etc…) in sever and the DHCP server dynamically assigns IP address and these configurations to the client on demand with lease time. The server can reassign address after lease expires or client can extend lease time dynamically.

When DHCP client boot, it broadcasts DISCOVER packet on local subnet and DHCP servers send OFFER packet with lease information.  DHCP client selects lease and broadcasts REQUEST packet and selected DHCP server sends ACKNOLEDGMENT packet. This is how client obtain IP address other configuration from the DHCP server. This process simply called DORA.

DHCP


Preparing for DHCP


Before you going to implement DHCP server, you must need to plan your network or else it will put you in trouble. While planning the network, make sure that the DHCP Server always remains accessible for the DHCP clients or provide a backup DHCP Server for times when the primary DHCP Server cannot be reached

You should be aware of below terms when you install DHCP server

Scope: - Scope is a valid range of IP addresses which are available for assignments or lease to client computers on a particular subnet. In a DHCP server, you configure a scope to determine the address pool of IPs which the server can provide to DHCP clients.

Super Scope: - A super scope is an administrative feature of DHCP servers that you can you can group multiple scopes as a single administrative entity. With this feature, a DHCP server can support DHCP clients on a single physical network segment (such as a single Ethernet LAN segment) where multiple logical IP networks are used. When more than one logical IP network is used on each physical subnet or network, such configurations are often called multinets.

Split scope: - This added feature in Windows server 2008 to provide a load balance or create a backup DHCP server.

Address Pool: - An address pool is a list of IP addresses which are available to the network clients. Each IP pool is defined by a starting IP address and an ending IP address. For an example starting IP address of 192.168.0.10 and the ending IP address of 192.168.0.20 represents 11 IP addresses.

Address Leases: - The DHCP lease is the length of time that the DHCP Server allows the client to use a particular assigned IP address.  When the client determines that it is about to expire, it sends a request to the server asking to increase the lease time. The server extends the lease if the DHCP policy allows it. If server not allowed or did not respond to the request, the client must restart the discovery process.

Reservations: Reservations are permanent lease assignments that are used to ensure that a specified client on a subnet can always use the same IP address.

Server options: - Options configured at the server level are applied to all DHCP clients, irrespective of the subnet on which they reside. Any options that you want to apply to all DHCP clients should be configured at this level, eg: if you wanted to configure all clients on the network to use the same DNS server, you would configure this option at server level.

Scope options: - If you want to configure DHCP options to apply only to DHCP clients on a specific subnet, you should configure the options at the scope level, eg: the IP address of the default gateway for a subnet should be configured at the scope level. 

How to reset the forgotten Router Username and Password

Posted by Muhammed Posted on Saturday, December 22, 2012


All Routers protect their web interfaces where you can manage their settings, with a default username and password. You can change these default passwords to protect the router from unauthorized access.

If you've forgotten the router’s password which you had set, there is a way to reset the password. But you may have to spend some time to reconfigure the settings which you made because this process may wipe out your configurations such as forwarded ports, network settings, parental controls, and custom passwords.

How to reset the Router to default settings?


All Routers come with a button you can press to reset the router to its default factory settings. The process may vary from router to router. So for better result refer your routers manual. However, usually this process is very similar on most routers.

Look at the back/bottom of the router and you can see a special button labeled Reset. To reset the router, you need to press this button and hold it down for about 10 seconds. After you release the button, the router will reset itself to the factory default settings and reboot. Once you done, you’ll be able to access the router with its default username and password.

The Reset button is located in a pinhole to avoid accidental hit on the button. You should use a narrow object to press and hold it.

How to find the Default Username and Password?


1. To locate the default username and password for the router, refer the user guide you received at the time you bought router OR look at the back of the Router, these passwords may sometimes be printed on a sticker on the router itself.

2. Try a common username and password combination. Many routers use admin as username and blank password or admin as both the username and password.   You can find a list of default usernames and passwords for various routers on routerpasswords.com


How to Install the Network Printer in Home or Office Network

Posted by Muhammed Posted on Wednesday, October 10, 2012

In home or office network, printer can be installed in two ways. One is install the printer on a local computer and share to the network. Second is connecting the printer directly to the network using hub or switch. The main difference between network and shared printer is, network printer can be access from any of the system on the network directly but to access shared printer, the local system need to be turned on.  Network printer used for large network and have its own IP address. Here I would like to share and article which describes how install the Network Printer.  

First of all connect the printer to the network and print a configuration sheet which will list basic information about the printer along with the current network configuration.  See the printer manual for more info.

Installation of Network printer

  1. Click on Start and select Printers and Faxes
  2. The Printers and Faxes window opens, on the menu bar select File - Add Printer
  3. The Add Printer Wizard opens, Click the Next> button
  4. Select Local Printer Attached to this computer. 
  5.  Make sure automatically detect and install my Plug and Play Printer is NOT selected.
  6. Click the Next> button and Select create a new Port.
  7. From the Type of port: pull down menu, select Standard TCP/IP Port
  8. Click the Next> button
  9. The Add Standard TCP/IP Wizard will open
  10. Click the Next> button
  11. In the Printer Name or IP Address, enter the printer's IP address or host name (IP address is preferred.)
  12. The wizard will create a Port Name based on the IP address or host name you entered.  If you want to make it more descriptive, you can change the Port Name.
  13. Click the Next> button
  14. The wizard will display a confirmation page.  Make a note of the Port Name in case you need to re-install the printer.
  15. Click the Finish Button
  16. The Install Printer Software window will appear.
  17. Select your printer's manufacturer from the list on the left
  18. Select your printer's model and driver from the list on the right
  19. If you can't find your printer driver in the list, it may be a newer printer.  Try clicking on the Windows Update button and repeat the last two steps.  If you need to use a specific driver from a disk, click on the Have Disk... button and follow the prompts to choose the driver.
  20. Click the Next> button
  21. The Name Your Printer window will appear.
  22. Windows will assign a name based on the printer driver you selected.  If you want to make it more descriptive, change the description in the Printer Name box.
  23. If you want this printer to be your default printer, choose the Yes radio button, if not choose the No radio button
  24. Click the Next> button
  25. The Print Test Page window appears.
  26. Select Yes
  27. Click the Next> button
  28. The wizard will display a confirmation window. 
  29. Click the Finish button.
  30. After a few seconds, files will be copied and drivers will be loaded. A dialog box will appear about your test page. .
  31. Click the OK button
  32. Check to see if your test page printed on the printer.

How to change the Gateway on Linksys PAP2 VOIP Adapter

Posted by Muhammed Posted on Sunday, October 07, 2012


1. Connect an analog phone to the RJ-45 connector on the PAP2.

2. Using the telephone keypad, press the star key (*) four (4) times: ****. You will hear the IVR Menu voice and be prompted to enter a code.

3. Enter 130 followed by the pound (#) key, you will hear the existing gateway IP on the phone.

4. To change Gateway IP enter 131 followed by the pound (#) key. You will hear the menu “enter value followed by pound key “.

5. Enter the gateway IP, 192.16.1.x (to enter dot (.)  Dial * button), followed by the pound (#) key. You will hear press 1 to save (Example - 192*16*1*254 # or 192*16*1*1 #).

6. Press 1, you will hear value saved. Hang up the phone and wait for all indicators light up on the adapter.

7. Then follow the step 3 and make sure you configured the Gateway properly.

Understanding IP Address

Posted by Muhammed Posted on Tuesday, February 21, 2012
An IP (Internet Protocol) address is a unique identifier for a node or host connection on an IP network. An IP address is a 32 bit binary number usually represented as 4 decimal values, each representing 8 bits, in the range 0 to 255 (known as octets) separated by decimal points. This is known as "dotted decimal" notation.
Example: 192.168.1.1
Every IP address consists of two parts, one identifying the network and one identifying the node. The Class of the address and the subnet mask determine which part belongs to the network address and which part belongs to the node address.

Address Classes

There are 5 different address classes. You can determine which class any IP address is in by examining the first 4 bits of the IP address.
  • Class A addresses begin with 0xxx, or 1 to 126 decimal.
  • Class B addresses begin with 10xx, or 128 to 191 decimal.
  • Class C addresses begin with 110x, or 192 to 223 decimal.
  • Class D addresses begin with 1110, or 224 to 239 decimal.
  • Class E addresses begin with 1111, or 240 to 254 decimal.
Addresses beginning with 01111111, or 127 decimal, are reserved for loop back and for internal testing on a local machine; [You can test this: you should always be able to ping 127.0.0.1, which points to yourself] Class D addresses are reserved for multicasting; Class E addresses are reserved for future use. They should not be used for host addresses
Now we can see how the Class determines, by default, which part of the IP address belongs to the network (N) and which part belongs to the node (n).
                Class A -- NNNNNNNN.nnnnnnnn.nnnnnnnn.nnnnnnnn
                Class B -- NNNNNNNN.NNNNNNNN.nnnnnnnn.nnnnnnnn
                Class C -- NNNNNNNN.NNNNNNNN.NNNNNNNN.nnnnnnnn