Showing posts with label WindowsXP. Show all posts

Device Manager is blank or empty - How to fix it?

Posted by Muhammed Posted on Thursday, September 20, 2012
Device Manager


Recently we have heard a problem with Device Manager and it shows blank or empty window when it opens. This behavior occurs if the Plug and Play service is turned off (disabled) or permissions in the registry for the Device Manager Key are corrupt.

Here is the solution for it.

Method1: Enable Plug and Play Windows Service

  1. Click Start, click Run, type services.msc, and then click OK.
  2. Double-click Plug and Play.
  3. If you receive a Configuration Manager message, click OK.
  4. In the Startup Type list, click Automatic, and then click OK.
  5. Close Services.
  6. Restart the computer.

Method2: Edit the registry permissions


Caution: Improper editing registry key may cause system instability. Hence, we highly recommend you to back up the registry settings before proceed.

  1. Go to "Start", "Run", and type "regedit"
  2. Navigate to “HKEY_LOCAL_MACHINE\SYSTEM\CurrentControlSet\Enum”
  3. Right-click on Enum and choose Permissions.  
  4. At this point you will probably notice there are no permissions on this key.
  5. Click "Add" and add the group "Everyone" and the user "SYSTEM".
  6. Select "Everyone" and check "Read" ONLY!
  7. Select "SYSTEM" and check "Full Control".
  8. Click the "Advanced" button and select "Replace permission entries on all child objects with entries shown here that apply to child objects".
  9. Click OK and if a warning message comes up, just click OK
  10. Close “regedit” and restart the computer
If you need more help post a comment here!

How to customize the keyboard shortcuts for your Applications

Posted by Muhammed Posted on Sunday, August 12, 2012
In my previous post we discussed about the common keyboard shortcuts. As I said earlier keyboard shortcuts are always a milestone to open application simply and quickly.  Here I would to share a trick which you can use to customize the keyboard shortcuts for regularly using application programs. So you can launch application when the combination of keys is pressed which you entered as the Shortcut Key for that application.

To create Shortcut key for any application in Windows:

1. Right click the program icon and select Properties.
2. Then select the Shortcut tab
3. Click in Shortcut key text box
4. Enter the keyboard shortcut for that program.

5. Press OK to exit
6. Use the Keyboard shortcut combo to launch the application.

Restore Broken File Association in Windows XP

Posted by Muhammed Posted on Saturday, May 12, 2012
Open with

If you are not able to open files with .exe and .lnk extensions and gets “Open With “while running any .exe and .lnk files ie regedit.exe, cmd.exe etc..., try the below steps to fix the File Association issue.

Step 1: open the command Prompt => Start -> Run -> Command.
Step 2: Navigate to C:\ and type the Following command as given below one by one.
assoc.exe=exefile
ftype exefile="%1" %* 
assoc.lnk=lnkfile
ftype lnkfile="%1" %*   
After executing the command, you won't have any issue with .exe and .lnk file.

REMOTE DESKTOP AND REMOTE ASSISTANCE

Posted by Muhammed Posted on Thursday, April 19, 2012

REMOTE DESKTOP

Remote desktop is a great feature in Windows.  Whether you need to connect to another computer in your network, or connect to your computer from anywhere there’s an internet connection, it’s an excellent alternative to more complicated remote connection methods.

How to Enable Remote Desktop?

1. Right click the Computer icon and select properties.

2. Click on Remote Tab

system properties

3. Select the radio button next to "Allow connections from computers running any version of Remote Desktop." 

Note: Alternatively, if you want to only connect to computer on your network- with higher security, you can check the radio button labeled "Allow connections only from computers running Remote Desktop with Network Level Authentication."  In choosing this option, you can even click the "Select Users" button to select specific users on your network to grant access to.

To Access Remote computer DESKTOP

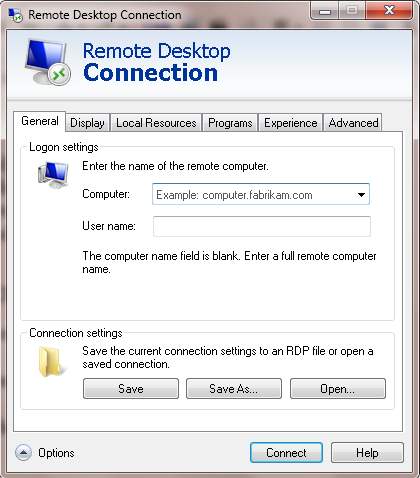
1. Click Start and select Run or Search, then type the command “mstsc”

Remote Desktop

2. Type the name, or choose the name, of the computer you want to connect to.

3.  Click the "Options" button to change display settings and size, and click "Connect.
Remote Desktop

REMOTE ASSISTANCE

Remote Assistance allows users to get help with any desktop related problem without requiring a service call. The person should be a friend or technical support representative - in other words someone you trust. From Windows, a remote user can view the desktop and even use their mouse and keyboard to fix a problem. In the same way, users can connect remotely to anyone else’s computer once they are invited.
Remote Assistance does allow remote users to connect to your computer, with your permission. However, once that person is into your system they can look at files, delete files, and basically do damage to your computer. Be sure the person who remotely accesses your computer is someone you trust. At any point you can cancel the assistance and disconnect the remote user from your machine.

Setup access for remote assistance

        1. Right click the Computer icon and select properties.
        2. Click on Remote Tab
System Properties

        3. Check Allow Remote Assistance invitations to be sent from this computer
        5. Click on Apply and OK.

How to Use Remote Assistance

1. Open the Start Menu and Select Help and Support.

2. From the menu, choose Use Windows Remote Assistance to get help from a
friend or offer help.

Remote Assistance

3. Choose either to Invite Someone or to Offer Help in the dialog.

4. Choose either to email them an invitation or to save the invitation as a text
file, which you can later transmit to them via an instant messenger program.

Remote Assistance

5. Create a password for the session. This password is not the administrator
password, but a password given for this specific session. It will expire after the
session invitation expires.

6. Click the Next button.

7. An email should pop up with the invitation and the file the remote user will
need to open to begin the remote use.

8. Send the email.

Accept an Invitation from a Friend or Colleague

1.       Open the email or invitation they sent.

2.       Double click the attached remote assistance support ticket.

3.       Enter the password provided.

4.       Begin exploring the remote desktop to fix the problem

Differences between Remote Desktop and Remote Assistance

Use Remote Assistance to give or receive assistance remotely. For example, a friend or a technical support person can access your computer to help you with a computer problem or show you how to do something. You can help someone else the same way. In either case, both you and the other person see the same computer screen. If you decide to share control of your computer with your helper, you will both be able to control the mouse pointer.
Use Remote Desktop to access one computer from another remotely. For example, you can use Remote Desktop to connect to your work computer from home. You will have access to all of your programs, files, and network resources, as if you were sitting in front of your computer at work. While you are connected, the remote computer screen will appear to be blank to anyone at the remote location who sees it.

How to fix Windows Explorer has stopped working?

Posted by Muhammed Posted on Thursday, April 12, 2012
Windows Explorer has stopped working


When working in Windows, you may receive the following error “Windows Explorer has stopped working.  Windows is restarting”. This issue can be caused due to Malware infection, system file or user profile corruption, and some applications or services running on your PC.


Resolution:

To resolve this issue you need to determine what is causing Windows Explorer to stop working. Try the troubleshooting steps below to help determine the issue.

Start Your PC in Safe Mode

First of all start your PC in Safe Mode and see if you can reproduce the error. After starting your PC in Safe Mode, work as you normally do and perform the same actions that you perform when getting the error. If you do not experience the same crashes in Safe Mode, it’s very likely a startup item is causing the issue. Do a Clean Boot and try to identify that which program or service causing the problem by enabling start up items one by one...
If you still receive the error in Safe Mode, go to the next section.

Scan your PC for Virus or Malware infections

Virus and Malware infections can cause problems with application performance. Use your favorite antivirus software to scan for any infections that might be hiding on your PC. If you don’t have an antivirus you can download free antivirus programs by following the link below.

Create new user account in Windows

Create a new user profile and work on it as normally you do and check whether there is any problem. If you do not experience the same crashes in new user profile, the cause of the problem might be the user profile corruption. Back up your personal files and delete the corrupted profile once you configured the new account with your preferences.
Thursday, April 12, 2012

Run System File Checker (CFS) to check your files


Use System File Checker to scan your PC for missing or corrupt files. To do this, follow these steps:
Click Start, and then type cmd in the Search box or Run window.
In the results area, right-click cmd.exe, and then click Run as administrator. You may be prompted to type the password for an administrator account.
Click Continue if you are the administrator or type the administrator password and then, click Continue.
At the command prompt, type Sfc /scannow and then press ENTER.
The scan may take some time, so be patient. Windows will repair any corrupted or missing files that are found. If information from the installation CD is needed to repair the problem, you may be prompted to insert your Windows CD.

Restore your computer using Windows System Restore.

Restoring your computer may help you to solve the problem if it happens due to any software changes that you made recently.

Repair or Reinstallation of Windows

The final solution is do a repair or reinstallation of windows.

How to Create new user account in Windows7, Vista and XP

Posted by Muhammed Posted on Thursday, April 12, 2012


Windows allows you to have multiple users sharing the same computer under their own individual accounts. This allows users to customize their desktop and other settings at their preferences. Also this allows each individual user to have their own location on the computer where they can store their personal documents, pictures, videos, saved games, and other personal data. Administrator can limit the user’s abilities which help to control other users on the computer.

If you are running Windows XP, Click Start > Control Panel and in the Control Panel, double click User Accounts. In the window that opens, select "Create a new account" and name your user account.
If running Windows Vista or 7 click Start>Control Panel>User Accounts and Family Safety>User Accounts>Manage another Account>Create New Account and name your user account.
It is important that specify the type of account when you create new account. There are two types of account, Standard User or Administrator. In Standard User, there have certain limitation compared to Administrator and Administrator can manage the Stranded user settings.

How to fix runonce.msn.com runonce2.aspx error in IE7

Posted by Muhammed Posted on Sunday, April 08, 2012


It is a known problem to IE7 users, when they opens Internet Explorer, their home page redirecting to the IE7 start up page runonce.msn.com runonce2.aspx and unable to change the home page or save the setting. The below steps which helps to resolve the problem. 


Windows XP: 


1. Click Start > Run and type the following into the Open box

regedit and  click OK.

2. Using the left-hand pane, navigate to the following registry key:

HKEY_CURRENT_USER\Software\Microsoft\Internet Explorer\Main

3. In the right-hand pane, right-click on RunOnceHasShown and change the value to 1

4. In the right-hand pane, right-click on RunOnceComplete and change the value to 1

5. Close Regedit and restart Internet Explorer 7 


Windows Vista or 7: 


1. Click Start >  and in the search type regedit

2. Right click on regedit and click on Run as Administrator

3. Using the left-hand pane, navigate to the following registry key:

HKEY_CURRENT_USER\Software\Microsoft\Internet Explorer\Main

4. In the right-hand pane, right-click on RunOnceHasShown and change the value to 1

5. In the right-hand pane, right-click on RunOnceComplete and change the value to 1

6. Close Regedit and restart Internet Explorer 7 

Note: If these Dwords are not there create new Dword with name RunOnceHasShown and RunOnceComplete and set the value as 1

The command prompt has been disabled by your administrator

Posted by Muhammed Posted on Saturday, March 31, 2012
cmd

Due to the restrictions placed in Registry when you attempt to run CMD.exe or a batch file, you may receive the message "The command prompt has been disabled by your administrator".   Try the below step to solve the problem.
  1. Open Registry Editor (Regedit.exe) and navigate to:[HKEY_CURRENT_USER\Software\Policies\Microsoft\Windows\System]
  2. In the right-pane, double-click DisableCMD and set its data to 0
OR
Click Start, Run and type or copy this command exactly as given below then click on ok.

REG add HKCU\Software\Policies\Microsoft\Windows\System /v DisableCMD /t REG_DWORD /d 0 /f